Last summer I gave a no cost update to one of my favourite cross stitched pieces by painting the frame and mat and now I love having it in our family room.


I recently was given some early 80's art prints in very large frames. The size and quality of the framing really made them worth rescuing. This print was faded, not my style and the layers of mats had dark green accent borders. I'm sure many of you have remade old frames, but for those who are hesitant I am sharing a simple tutorial. Hang in for the surprise ending!
The first thing to do is find a suitable frame.
The first thing to do is find a suitable frame.

before
I measured the opening and ordered a 16" x 24" reprint of a favourite barn photo I took this summer at a relative's farm. Choose a print from your own photos, or order one from places like etsy. The reprint cost $24 from our local photo store.

Then I removed the paper dust backing and took the print, mat and glass out. The glass should be cleaned well to remove dust and fingerprints (both sides.) Just be cafeful as you handle the edges of the glass. They can be quite sharp.

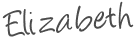
I used my Benjamin Moore mistint in black to paint the frame with a brush. The wood frame was in fairly good shape, but I wanted to get rid of the gold accent. The black also suits our home and the barn photo better than the previous colour of wood. Allow sufficient dry time between coats, depending on the paint label instructions.

The photo above shows a can of black spray paint, but since it is too frigid cold here to use spray paint outdoors I decided on the latex paint. If your weather is mild, you might want to save time and use the spray paint.
The mat was in good shape but I wanted it to be a nice crisp white instead of the off white. I also wanted to cover the dark green lower mat. I used white Behr Paint-and-Primer-in-One that I had left over from other projects. Again I used a good quality wall brush to paint several thin layers (to avoid drips and to get in to the different layers of mats.) As for the frame, allow enough dry time between coats.

I made seven dozen of our favourite Toll House chocolate chip cookies between coats of paint.
I waited overnight for the paint to dry thoroughly before putting everything back together. That's when we had the mishap! My son was helping me handle the large piece of glass and it just wasn't settling into the frame properly. I had just started to say "don't force it" when he applied a bit too much pressure and the glass broke! Luckily there were no injuries. I am ordering a new piece of glass from the local glass company and will share the 'after' once I put it all back together.
Cost breakdown:
Frame, mat free
Paint free leftover paint from other projects
Print $24
New glass $ to be determined
Total $ to be determined
Even though we had a set back, I'm really glad I tackled this project. I love the results so far and the final cost will still be way cheaper than gallery framing! I'm joining The Lettered Cottage's How To's Day. Hope to 'see' you there!

Post Title
→Barn Print Tutorial and a Mishap
Post URL
→http://learningwithimpact.blogspot.com/2011/03/barn-print-tutorial-and-mishap.html
Visit Learning with Impact for Daily Updated Collection


